Blog

History of Artificial Intelligence

Artificial Intelligence is not a concept of now, but of the ancient Greek times. The inanimate object can come to life is not just a concept in sci-fi movies, but is much older than you can imagine. There are myths of mechanical men and robots in ancient Greek and Egypt. However, John McCarthy coined the term Artificial Intelligence not before 1955. Let us glance through a brief history of AI:

History of AI - Alan Turing Test, AI program, John McCarthy, Eliza, Wabot, Boom of AI, World Chess Champion, 1st AI vacuum cleaner, AI in Netflix, Chatbot, Google Duplex.

What is AI? Check out this blog with exciting examples – Click here

Infobytes

Alan Turing TestTuring Test Description Artificial Intelligence

It is a test to determine whether a computer can think like a human being or not. 

It consists of three participants – a human evaluator(X) on one side and a human(A) and a computer(B) on the other side. If the evaluator (X) can’t recognize which candidate is human and which candidate is a computer after a series of questions, the computer successfully passes the Turing test. If the computer system successfully mimics the human, then it has passed the Alan Turing Test. 

To date, no AI has passed the Turing test, but some came pretty close.  

 
ELIZA – First Chatbot
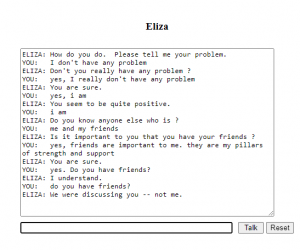
Eliza - First Chatbot using Artificial Intelligence

The first chatbot

Bots are able to have human-like interaction because they are powered by two technologies – artificial intelligence and natural language processing that provides human-like intelligence to the bots.

ELIZA, aimed at tricking its users by making them believe that they were having a conversation with a real human being.

ELIZA operates by recognizing keywords or phrases from the input to reproduce a response using those keywords from pre – programmed responses.  For instance, if a human says that ‘My mother cooks good food’. ELIZA would pick up the word ‘mother’, and respond by asking an open- ended question ‘Tell me more about your family’. This created an illusion of understanding and having an interaction with a real human being though the process was a mechanized one.

 
WABOT
Robot - Wabot using Artificial Intelligence

First Robot – WABOT

This robot had hands and limbs that could extend and grab objects as well as legs that could walk in a rudimentary fashion. WABOT-1 also had semi-functional ears, eyes, and a mouth. The robot uses these sensory devices to communicate with a person in Japanese and estimate distances. Experts have estimated that WABOT had the mental faculty of a one-and-a-half-year-old child.

Computer beats the World Champion
World History - AI defeats human chess and becomes a champion

AI defeats the human opponent to become wold chess champion.

On May 11, 1997, an IBM computer called IBM Deep Blue beat the world chess champion after a six-game match: two wins for Deep Blue, one for the champion, and three draws. The match lasted several days and attracted massive media coverage around the world. It was the classic plot line of man vs. machine. It pushed forward the ability of computers to handle complex calculations needed to help discover new medical drugs; do broad financial modeling, identify trends, and do risk analysis; handle large database searches, and perform massive calculations needed in many fields of science.

This experiment formed the base for the upcoming parallel computing and Artificial Intelligent technologies.

 
Roomba – vacuum cleaner
First Vacuum Cleaner using Artificial Intelligence

First AI Vacuum Cleaner – Roomba

The battery-operated Roomba rolls on wheels and responds to its environment with the help of sensors and computer processing. When it bumps into an obstacle or detects an infrared beam, a boundary line the robot will change direction randomly.

 
Duplex
Google Duplex - AI assistant booking an appointment for haircut at a salon

Google Duplex

A technology that sounds natural to make customer experience comfortable. Duplex makes a phone call and arranges an appointment at a salon for the user. The receptionist at the salon doesn’t even realize that s/he was having a conversation with a machine(Duplex). 

The peak of AI is yet to come…

What are you waiting for? It is time to make your own AI model now – Click here

Author:

Blog

What is Artificial Intelligence

In your mind, how many times have you asked yourself: What is artificial intelligence? Let’s begin with a very simple analogy to understand Artificial Intelligence.

Working with AI is as good as parenting a child. Consider a pretty baby girl is born to a cute couple. When she is born, she knows nothing. The parents teach her that “Dear this is ‘a’, ‘b’, ‘c’. This is a fruit. You should stop when the signal shows red for people. When there is an obstacle in front of you, you should change your direction or move the obstacle”. 

Artificial Intelligence means parents teaching a child.

AI and robots are ancient Greek concepts – See here

Over time, she learns new things, sometimes with her parent’s help, sometimes on her own(machine learning). She begins anticipating and completing their statements based on past experiences. She knows, she will be punished for doing something wrong.

A computer system/device is the child, and we humans are its parents. We teach the skills of human beings to machines. We train the machines and give them their artificial intelligence.

Now, machines can identify things, learn, predict and mimic humans. These thinking machines have Artificial Intelligence. I think now you are ready for the technical definition of artificial intelligence.

Artificial Intelligence (AI) is the ability of computers to do things that are considered attributes of intelligence i.e. computers possess the ability to process language, understand pictures, perceive the environment, learn from the past, reason, etc.

Categories of AI


Weak AI


Narrow AI is also known as Weak AI. Weak AI can only perform specific tasks rather than possess full cognitive abilities like humans. Only Narrow AI exists today.

Some examples are – digital voice assistants, recommendation engines, search engines, chatbots, etc.

Artificial Intelligence used in chatbot

Strong AI


Strong AI is also known as Artificial Generalized Intelligence. It is only theoretical currently. Strong AI means the machines will have minds of their own. They will not need programming inputs. They can complete any task using their decision-making skills and full human cognitive abilities. The machine can feel, think, reason, remember, and act on its own. Machines behave like humans. Also, they can solve problems in a generalized way using their intelligence instead of performing some specific tasks only.

Super AI


There are no clear examples of strong artificial intelligence. Thankfully, the field of AI is rapidly innovating. A new AI theory has emerged, known as artificial superintelligence (ASI), superintelligence, or Super AI. This type surpasses strong AI in human intelligence and ability. However, Super AI is still purely speculative as we still have to achieve examples of Strong AI.

To create your own AI models – Click here

Author:


In-House AI models

Model Name – Satellite Aeroplane Detection

What does the model detect?
This model detects aeroplanes on the ground from satellite imagery.

What is the use of this model?
This model could serve in military applications and for better surveillance of airports.

Approach to creating a model in Vredefort

Step 1 – Dataset Collection
We collected satellite images of aeroplanes from the Google Earth website. In google earth, we kept a 2D view with a certain fixed height(80 m). We selected the 100 busiest airports and collected 1463 images of aeroplanes. There is only one class – Aeroplane.

Step 2 – Data Cleaning
After collecting the dataset, we uploaded it on Vredefort. Vredefort automatically cleans the data by removing the corrupt images and resizing them to a suitable resolution.

Step 3 – Data Annotation
The computer learns to detect objects from images through a process of labeling. Thus, we drew boxes around the concerned objects and labeled them as Aeroplane (only one object to detect).
We annotated 1463 images using the inbuilt Vredefort tool.

Annotation Rules – (Keep them in mind for better detection)
⦁ Skip the object if it is in motion or blur.
⦁ Precisely draw the bounding box around the object.
⦁ Bounding boxes should not be too large.

[Optional] Step 4 – Tuning Parameters
If you register as a developer and developer mode is on, you can modify the number of epochs, batch size per GPU, neural network model, etc. In case of no user inputs, the settings will change to default.

Step 5 – Training
The training process takes place automatically with a single click.

Evaluation of the model
After training, we can evaluate the model.
In evaluation, there are two parts. The first is accuracy and the second is to play inference videos. Vredefort enables us to obtain total model accuracy and class-wise accuracy. In this case, only one class is present. We achieved 76% model accuracy.

A new video for inference
We recorded video with the help of SimpleScreenRecorder with same 2D view and fixed height and that video used to check the inference. If the developer mode is on, it will ask to set confidence. You can set it as per your convenience. Here we set 0.1 [10%] confidence.

Model download and transfer learning from unpruned model
Vredefort provides one more feature to get the accuracy of the model. It allows you to download the model and dataset for further applications(like adding logic to your model). If you have downloaded model files, you can use the unpruned model (click here to know more about the unpruned model) for different datasets and save training time. You can generate alerts and write use-cases with that model.

Any challenges faced
None

Limitations
⦁ The model will work best on satellite imagery with 80m of height
⦁ The model is trained on satellite imagery and hence will work best on those images or video feeds.
⦁ It will struggle to detect aeroplanes from other sources such as mobile camera videos.

Improvements
More datasets can be collected to detect aeroplanes from different heights and sources to improve the model accuracy.

Model Details

Model Name – Satellite Aeroplane Detection
Dataset Images – 1463
Number of Labels – 1
Label name and count – aeroplanes (6605)
Accuracy – 76%

Download Links

Dataset Download – Download here

Model Download Link – Download here

Inference Video Link – Download here

Author:

In-House AI models

Model Name – Car parking occupancy Detection

What does the model detect?
This model detects occupancy for car parking in images/videos.

What is the use of this model?
Techniques for car parking occupancy detection are significant for the management of car parking lots. Knowing the real-time availability of free parking spaces and communicating it to the users helps reduce the queues, improve scalability, and minimize the time required to find a place in the parking lot. In many parking lots, ground sensors determine the status of the various spaces. These require expensive installation and maintenance of sensors in every parking space, especially in parking lots with more available spots. So this model can be used to overcome this problem.

Approach to creating a model in Vredefort

Step 1 – Dataset Collection
We collected 1497 dataset images from an open-source. These images were captured from a camera mounted on a building rooftop in front of a car parking lot. Then we split the dataset into train and test. There were two classes – Car and Vacant.

Step 2 – Data Cleaning
After collecting the dataset, we uploaded it on Vredefort. Vredefort automatically cleans the data by removing the corrupt images and resizing them to a suitable resolution.

Step 3 – Data Annotation
The computer learns to detect objects from images through a process of labeling. Thus, we drew boxes around the concerned objects and labeled them as car and vacant accordingly. We annotated 1497 images using the inbuilt Vredefort tool.
Annotation Rules – (Keep them in mind for better detection)
    ⦁ Skip the object if it is in motion or blur.
    ⦁ Precisely draw the bounding box on the object.
    ⦁ Bounding boxes should not be too large.

[Optional] Step 4 – Tuning Parameters
If you register as a developer and developer mode is on, you can modify the number of epochs, batch size per GPU, neural network model, etc. In case of no user inputs, the settings will change to default.

Step 5 – Training
The training process takes place automatically with a single click.

Evaluation of the model
After training, we can evaluate the model.
In evaluation, there are two parts. The first is accuracy and the second is to play inference videos. Vredefort enables us to obtain total model accuracy and class-wise accuracy. In this case, three classes are present. We achieved 40% model accuracy. Individual class accuracy is 64% for car and 16% for vacant.

A new video for inference
We made a video from test dataset images and used it for interference. If the developer mode is on, it will ask to set confidence. You can set it as per your convenience. Here we set 0.1 [10%] confidence.

Model download and transfer learning from unpruned model
Vredefort provides one more feature to get the accuracy of the model. It allows you to download the model and dataset for further applications(like adding logic to your model). If you have downloaded model files, you can use the unpruned model (click here to know more about the unpruned model) for different datasets and save training time. You can generate alerts and write use-cases with that model.

Any challenges faced
The model was not working well as the white parking lines were not visible clearly. The vacant spots were not detected precisely so we annotated more images to reduce
the errors.

Limitations
     ⦁ The model is trained on an outdoor camera and hence will work best on those images or video feed.
     ⦁ It will struggle to detect parking spots if the white lines are not visible.

Improvements
For more accuracy, collect the dataset from different angles, including complex environments, and balance the dataset for all the classes by reducing the mismatch in the number of images. You need not worry about class imbalance if images in your dataset are balanced for all classes.

Model Details
Model Name – Car parking occupancy Detection
Dataset Images – 1497
Number of Labels – 2
Label name and count – Car (7740), Vacant (8745)
Accuracy – 40%
Class Accuracy – Car (64%), Vacant (16%)

Download Links

Dataset Download –  Download here

Model Download Link – Download here 

Inference Video Link – Download here 

Author:

In-House AI models

Model Name – Satellite Ship Detection

What does the model detect?
This model detects ships in the sea from satellite imagery.

What is the use of this model?
This model empowers the government institutions for strict and finer maritime security surveillance. It helps to manage marine traffic at busy ports. The detection enables the concerned authorities to take quick decisions and reduce pirate threats.

Approach to creating a model in Vredefort

Step 1 – Dataset Collection
We collected satellite images of ships from the Google Earth website. In google earth, we kept a 2D view with a certain fixed height – 100m for big ships and 60 m for small ships. We selected the 50 busiest ports and collected 645 ship images. There is only one class – Ship.

Step 2 – Data Cleaning
After collecting the dataset, we uploaded it on Vredefort. Vredefort automatically cleans the data by removing the corrupt images and resizing them to a suitable resolution.

Step 3 – Data Annotation
The computer learns to detect objects from images through a process of labeling. Thus, we drew boxes around the concerned objects and labeled them as ship (only one object to detect).
We annotated 645 images using the inbuilt Vredefort tool.

Annotation Rules – (Keep them in mind for better detection)
    ⦁ Skip the object if it is in motion or blur.
    ⦁ Precisely draw the bounding box around the object.
    ⦁ Bounding boxes should not be too large.

[Optional] Step 4 – Tuning Parameters
If you register as a developer and developer mode is on, you can modify the number of epochs, batch size per GPU, neural network model, etc. In case of no user inputs, the settings will change to default.

Step 5 – Training
The training process takes place automatically with a single click.

Evaluation of the model
After training, we can evaluate the model.
In evaluation, there are two parts. The first is accuracy and the second is to play inference videos. Vredefort enables us to obtain total model accuracy and class-wise accuracy. In this case, only one class is present. We achieved 55% model accuracy.

A new video for inference
We recorded a video of a 2D view with fixed height using a SimpleScreenRecorder to check the inference. If the developer mode is on, it will ask to set confidence. You can set it as per your convenience. Here we set 0.1 [10%] confidence.

Model download and transfer learning from unpruned model
Vredefort provides one more feature to get the accuracy of the model. It allows you to download the model and dataset for further applications(like adding logic to your model). If you have downloaded model files, you can use the unpruned model (click here to know more about the unpruned model) for different datasets and save training time. You can generate alerts and write use-cases with that model.

Any challenges faced
Collecting the images was challenging due to security reasons at certain ports.

Limitations
    ⦁ The model will work best on satellite imagery with 100m of height for big ships and 60m of height for small ships.
    ⦁ The model is trained on satellite imagery and hence will work best on those images or video feeds.
    ⦁ It will struggle to detect ships from other sources such as mobile camera videos.

Improvements
More datasets can be collected to detect ships of different heights and from varied sources to improve the model accuracy.

Model Details
Model Name – Satellite Ships Detection
Dataset Images – 645
Number of Labels – 1
Label name and count – ship (1399)
Accuracy – 55%

Download Links

Dataset Download – Download here

Model Download Link – Download here

Inference Video Link – Download here

Author: