Category: In-House AI models

In-House AI models

Model Name – Safety hat and vest detection

What does the model detect?
This model detects safety hat and vest in images

What is the use of this model?
In industry, the top cause of construction-related casualties are falling, people getting stuck in the equipment, electrocution, and collisions. If workers wear appropriate personal protective equipment like a safety vest and hard hat, the majority of these injuries can be prevented. This model helps to reduce the number of casualties and ensure workers’ safety.

Approach to creating a model in Vredefort

Step 1 – Dataset Collection
We recorded a video in the RTSP camera through the VLC player. And 3633 images were collected from that.
There are three classes ie. Safety Hat, Safety Vest, and Person.

Step 2 – Data Cleaning
After collecting the dataset, we uploaded it on Vredefort. Vredefort automatically cleans the data by removing the corrupt images and resizing them to a suitable resolution.

Step 3 – Data Annotation
The computer learns to detect objects from images through a process of labeling. Thus, we drew boxes around the concerned objects and labeled them as safety hat/safety vest/person accordingly.
We annotated 3633 images using the inbuilt Vredefort tool.

Annotation Rules – (Keep them in mind for better detection)
     ⦁ Skip the object if it is in motion or blur.
     ⦁ Precisely draw the bounding box on the object.
     ⦁ Bounding boxes should not be too large.

[Optional] Step 4 – Tuning Parameters
If you register as a developer and developer mode is on, you can modify the number of epochs, batch size per GPU, neural network model, etc. In case of no user inputs, the settings will change to default.

Step 5 – Training
The training process takes place automatically with a single click.

Evaluation of the model
After training, we can evaluate the model.
In evaluation, there are two parts. The first is accuracy and the second is to play inference videos. Vredefort enables us to obtain total model accuracy and class-wise accuracy. In this case, three classes are present. We achieved 86% model accuracy. Individual class accuracy is 80% for Safety Hat, 88% for Safety Vest, and 93% for Person.

A new video for inference
We recorded video with the help of VLC player and made video from that to check the inference. If the developer mode is on, it will ask to set confidence. You can set it as per your convenience. Here we set 0.1 [10%] confidence.

Model download and transfer learning from unpruned model
Vredefort provides one more feature to get the accuracy of the model. It allows you to download the model and dataset for further applications(like adding logic to your model). If you have downloaded model files, you can use the unpruned model (click here to know more about the unpruned model) for different datasets and save training time. You can generate alerts and write use-cases with that model.

Any challenges faced
The model detected red shirts as safety vests. We collected more images of people who wore red shirt/tshirt and annotated them precisely to avoid confusion and resolve this.

Limitations
     ⦁ The model is trained on specific office premise video feeds. It will struggle to detect the objects in other areas.

Improvements
The best approach is to record images or videos of the construction site. This approach informs about scenes that empower understanding the complex construction sites more promptly. For more accuracy, collect the dataset from different angles and balance the dataset for both classes by reducing the mismatch in the number of images. You need not worry about data imbalance situation if images in your dataset are balanced for all classes.

Model Details
Model Name – Safety hat and vest Detection
Dataset Images – 3633
Number of Labels – 3
Label name and count – Safety Hat (3139), Safety Vest (3369), Person (6587)
Accuracy – 86%
Class Accuracy – Safety Hat (80%), Safety Vest (88%), Person (93%)

Download Links

Dataset Download – Download here

Model Download Link – Download here

Inference Video Link – Download here

Author:

 

In-House AI models

Model Name – Pothole Detection

What does the model detect?
This model detects potholes in images/videos.

What is the use of this model?
Potholes form due to the weathering, wear, and tear of roads. They cause discomfort and result in the deaths of citizens due to vehicle accidents. The Indian government stated that 4,775 and 3,564 accidents occurred due to potholes and bad road conditions in 2019 and 2020 respectively. There are numerous use cases of this detection system. For example, the civic authorities can plan for repairs by detecting, locating, and assessing the magnitude of potholes using this model. Cameras installed on moving vehicles can detect potholes in real-time and help drivers avoid potholes. Self-driving cars can steer clear of potholes according to detection.

Approach to creating a model in Vredefort

Step 1 – Dataset Collection
We collected a dataset of 504 images from Kaggle. The images were captured from cameras installed on moving cars. We kept 50 images for testing. There is only one class – Pothole.

Step 2 – Data Cleaning
After collecting the dataset, we uploaded it on Vredefort. Vredefort automatically cleans the data by removing the corrupt images and resizing them to a suitable resolution.

Step 3 – Data Annotation
The computer learns to detect objects from images through a process of labeling. Thus, we drew boxes around the concerned objects and labeled them as pothole (only one object to detect).
We annotated 504 images using the inbuilt Vredefort tool. The 50 test images need not be annotated.

Annotation Rules – (Keep them in mind for better detection)
     ⦁ Skip the object if it is in motion or blur.
     ⦁ Precisely draw the bounding box on the object.
     ⦁ Bounding boxes should not be too large.

[Optional] Step 4 – Tuning Parameters
If you register as a developer and developer mode is on, you can modify the number of epochs, batch size per GPU, neural network model, etc. In case of no user inputs, the settings will change to default.

Step 5 – Training
The training process takes place automatically with a single click.

Evaluation of the model
After training, we can evaluate the model.
In evaluation, there are two parts. The first is accuracy and the second is to play inference videos. Vredefort enables us to obtain total model accuracy and class-wise accuracy. In this case, only one class is present. We achieved 10% model accuracy.

A new video for inference
We made a video from test dataset images and used it for interference. If the developer mode is on, it will ask to set confidence. You can set it as per your convenience. Here we set 0.1 [10%] confidence. 

Model download and transfer learning from unpruned model
Vredefort provides one more feature to get the accuracy of the model. It allows you to download the model and dataset for further applications(like adding logic to your model). If you have downloaded model files, you can use the unpruned model (click here to know more about the unpruned model) for different datasets and save training time. You can generate alerts and write use-cases with that model.

Any challenges faced
The dataset was on the road where potholes were not visible clearly.

Limitations
     ⦁ The model is trained on a camera installed on moving cars in front of the driver’s seat, hence will work best              on those images or video feeds.
     ⦁ It will struggle to detect potholes from other sources such as mobile camera videos.

Improvements
For more model accuracy, collect the dataset from different angles and weather conditions.

Model Details
Model Name – Potholes Detection
Dataset Images – 504
Number of Labels – 1
Label name and count – pothole (800)
Accuracy – 10%

Download Links

Dataset Download – Download here

Model Download Link – Download here

Inference Video Link – Download here

Author:
In-House AI models

Model Name – Fruits Detection

What does the model detect?
This model detects fruits in images/videos.

What is the use of this model?
The handling of perishable foods like fruits in the supply chain involves sorting, weighing, and identifying expired produce. Traditionally, these processes were done manually but are being more automated as technology advances. Recently, Industrial IoT and AI are increasingly playing a role in supply chains. Industry players can utilize technologies like image recognition to help classify products, make decisions at the edge, and optimize their operations. This model empowers industries in many ways.

Approach to creating a model in Vredefort

Step 1 – Dataset Collection
For the dataset, we made one video of 4 fruits. Vredefort automatically converted the video into images. There were 1267 images and four classes ie. Apple, Banana, Watermelon, and Grapes.

Step 2 – Data Cleaning
After collecting the dataset, we uploaded it on Vredefort. Vredefort automatically cleans the data by removing the corrupt images and resizing them to a suitable resolution.

Step 3 – Data Annotation
The computer learns to detect objects from images through a process of labeling. Thus, we drew boxes around the concerned objects and labeled them as apple, banana, watermelon, and grapes accordingly. We annotated 1267 images using the inbuilt Vredefort tool.

Annotation Rules – (Keep them in mind for better detection)
     ⦁ Skip the object if it is in motion or blur.
     ⦁ Precisely draw the bounding box on the object.
     ⦁ Bounding boxes should not be too large.

[Optional] Step 4 – Tuning Parameters
If you register as a developer and developer mode is on, you can modify the number of epochs, batch size per GPU, neural network model, etc. In case of no user inputs, the settings will change to default.

Step 5 – Training
The training process takes place automatically with a single click.

Evaluation of the model
After training, we can evaluate the model.
In evaluation, there are two parts. The first is accuracy and the second is to play inference videos. Vredefort enables us to obtain total model accuracy and class-wise accuracy. In this case, three classes are present. We achieved 97% model accuracy. Individual class accuracy is 96% for apple, 99% for banana, 99% for watermelon, and 97% for grapes.

A new video for inference
We made a same another video of 4 fruits and used it for interference. If the developer mode is on, it will ask to set confidence. You can set it as per your convenience. Here we set 0.1 [10%] confidence.

Model download and transfer learning from unpruned model
Vredefort provides one more feature to get the accuracy of the model. It allows you to download the model and dataset for further applications(like adding logic to your model). If you have downloaded model files, you can use the unpruned model (click here to know more about the unpruned model) for different datasets and save training time. You can generate alerts and write use-cases with that model.

Any challenges faced
None

Limitations
     ⦁ The model is trained on only 4 fruits(apple, banana, grapes, watermelon) images and hence, will work best              on those images or video feed.
     ⦁ It will struggle to detect fruits wherever other fruits images/videos or complex backgrounds are present in                images/videos.

Improvements
For more accuracy, collect the dataset from different angles, include complex environments, and balance the dataset for all the classes by reducing the mismatch in the number of images. You need not worry about class imbalance if images in your dataset are balanced for all classes.

Model Details
Model Name – Fruits Detection
Dataset Images – 1267
Number of Labels – 4
Label name and count – apple (1233), banana (1218), grapes (1181), watermelon (1120)
Accuracy – 97%
Class Accuracy – apple (96%), banana (99%), grapes (97%), watermelon (99%)

Download Links

Dataset Download – Download here

Model Download Link – Download here

Inference Video Link – Download here

Author:

In-House AI models

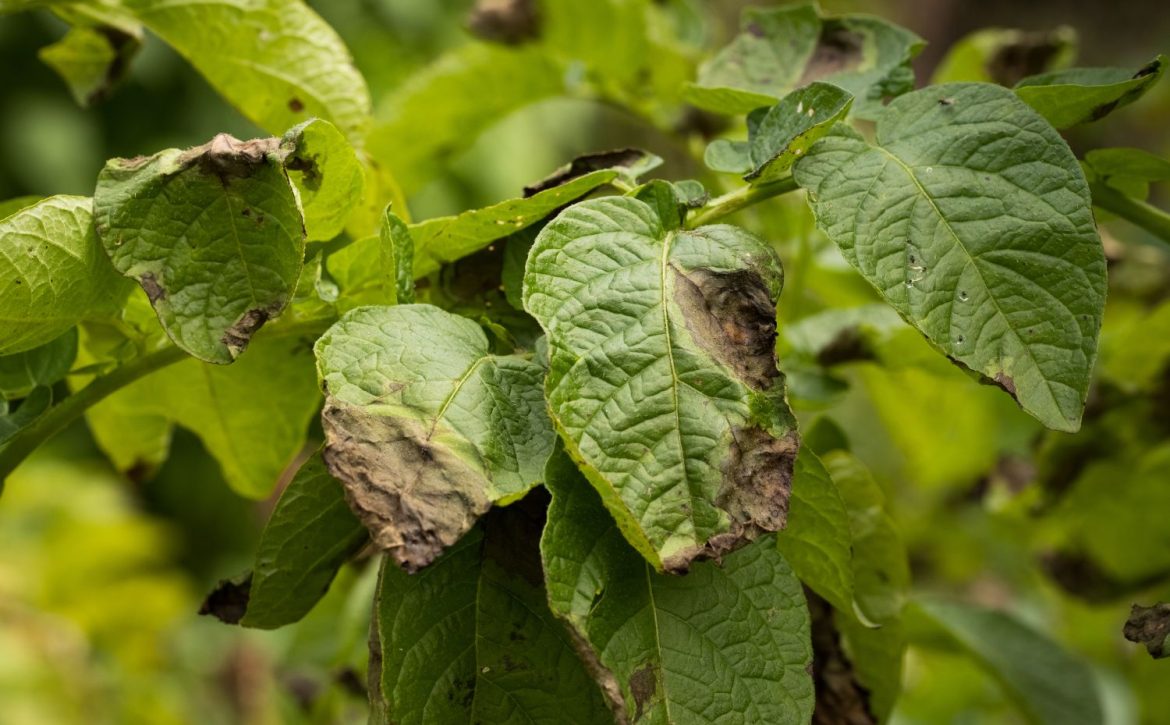
Model Name – Potato leaf disease detection

What does the model detect?
This model detects and identifies potato leaf diseases in images.

What is the use of this model?
Farmers who grow potatoes suffer from serious financial losses each year due to several diseases that affect potato plants. The diseases Early blight and Late blight are most frequent. Early blight is caused by fungus and late blight is caused by specific microorganisms. If farmers detect this disease early and apply appropriate treatment then it can save the potato plants, minimize waste and prevent economical loss.

Approach to creating a model in Vredefort

Step 1 – Dataset Collection
We collected a dataset of 899 images from Kaggle.There are three classes ie. Healthy, Early Blight, and Late Blight.

Step 2 – Data Cleaning
After collecting the dataset, we uploaded it on Vredefort. Vredefort automatically cleans the data by removing the corrupt images and resizing them to a suitable resolution.

Step 3 – Data Annotation
The computer learns to detect objects from images through a process of labeling. Thus, we drew boxes around the concerned objects and labeled them as healthy/early blight/late blight accordingly.
We annotated 899 images using the inbuilt Vredefort tool.

Annotation Rules – (Keep them in mind for better detection)
     ⦁ Skip the object if it is in motion or blur.
     ⦁ Precisely draw the bounding box on the object.
     ⦁ Bounding boxes should not be too large.

[Optional] Step 4 – Tuning Parameters
If you register as a developer and developer mode is on, you can modify the number of epochs, batch size per GPU, neural network model, etc. In case of no user inputs, the settings will change to default.

Step 5 – Training
The training process takes place automatically with a single click.

Evaluation of the model
After training, we can evaluate the model.
In evaluation, there are two parts. The first is accuracy and the second is to play inference videos. Vredefort enables us to obtain total model accuracy and class-wise accuracy. In this case, three classes are present. We achieved 90% model accuracy.
Individual class accuracy is 94% for Healthy, 92% for Early blight, and 86% for Late Blight.

A new video for inference
We made a video from test dataset images and used it for interference. If the developer mode is on, it will ask to set confidence. You can set it as per your convenience. Here we set 0.1 [10%] confidence.

Model download and transfer learning from unpruned model
Vredefort provides one more feature to get the accuracy of the model. It allows you to download the model and dataset for further applications(like adding logic to your model). If you have downloaded model files, you can use the unpruned model (click here to
know more about the unpruned model) for different datasets and save training time. You
can generate alerts and write use-cases with that model.

Any challenges faced
None

Limitations
     ⦁ The model will work best where one leaf per frame is present in images or videos.
     ⦁ It will struggle to detect wherever a bunch of leaves is present in images/videos.

Improvements
For more accuracy, collect the dataset from different angles and balance the dataset for both classes by reducing the mismatch in the number of images. You need not worry about class imbalance if images in your dataset are balanced for all classes.

Model Details
Model Name – Potato leaf disease Detection
Dataset Images – 899
Number of Labels – 3
Label name and count – Healthy (299), Early Blight (300), Late Blight (300)
Accuracy – 90%
Class Accuracy – Healthy (94%), Early Blight (92%), Late Blight (86%)

Download Links

Dataset Download – Download here

Model Download Link – Download here

Inference Video Link – Download here

Author:

In-House AI models

Model Name – Pink eye and Normal eye Detection

What does the model detect?
This model detects pink eyes and normal eyes in images.

What is the use of this model?
The eye is one of the most critical tangible organs in the human body. Eye diseases are a typical medical problem around the globe. The detection will help medical professionals detect pink eyes faster and more efficiently. This model has medical uses.

Approach to creating a model in Vredefort

Step 1 – Dataset Collection
We collected data from an open-source. There are two classes, namely Pink eye and Normal eye.

Step 2 – Data Cleaning
After collecting the dataset, we uploaded it on Vredefort. Vredefort automatically cleans the data by removing the corrupt images and resizing them to a suitable resolution.

Step 3 – Data Annotation
The computer learns to detect objects from images through a process of labeling. Thus, we drew boxes around the concerned objects and labeled them as pink eye/normal eye accordingly.
We annotated 254 images using the inbuilt Vredefort tool.

Annotation Rules – (Keep them in mind for better detection)
      ⦁ Skip the object if it is in motion or blur.
      ⦁ Precisely draw the bounding box on the object.
      ⦁ Bounding boxes should not be too large.

[Optional] Step 4 – Tuning Parameters
If you register as a developer and developer mode is on, you can modify the number of
epochs, batch size per GPU, neural network model, etc. In case of no user inputs, the
settings will change to default.

Step 5 – Training
The training process takes place automatically with a single click.

Evaluation of the model

After training, we can evaluate the model.
In evaluation, there are two parts. The first is accuracy and the second is to play inference videos. Vredefort enables us to obtain total model accuracy and class wise accuracy. In this case, two classes are present. We achieved 51% accuracy. Individual class accuracy is 65% for pink eye and 38% for the normal eye.

A new video for inference
We made a video from test dataset images and used it for interference. If the developer mode is on, it will ask to set confidence. You can set it as per your convenience. Here we set 0.1 [10%] confidence.

Model download and transfer learning from unpruned model
Vredefort provides one more feature to get the accuracy of the model. It allows you to download the model and dataset for further applications(like adding logic to your model). If you have downloaded model files, you can use the unpruned model (click here to know more about the unpruned model) for different datasets and save training time. You can generate alerts and write use-cases with that model.

Any challenges faced
None

Limitations
      ⦁ The model will work best on a person’s face images where the eyes are visible.
      ⦁ The model is trained on face images, hence will work best on those images or video feed.
      ⦁ It will struggle to detect eyes whenever full person images/videos are provided.

Improvements
For more accuracy, collect the dataset from different angles and balance the dataset for both classes by reducing the mismatch in the number of images. You need not worry about class imbalance if images in your dataset are balanced for all classes.

Model Details
Model Name – Pink eye and Normal eye Detection
Dataset Images – 254
Number of Labels – 2
Label name and count – pink eye (152), normal eye (181)
Accuracy – 51%
Class Accuracy – pink eye (65%), normal eye (38%)

Download Links

Dataset Download – Download here

Model Download Link – Download here

Inference Video Link – Download here

Author: